I’ve jumped on the 3D printer wave, intending to build my own RepRap inspired 3D printer. I’ve found an old microscope platform to customize. This platform has an XY-table and a precise Z axis.
I wanted to spend time building my own 3d printer, but not all of my time. I wanted to get better at mechanics and xyz control.
With that on my mind I’ve taken the following design choices:
- Build the printer, not buy a kit
- Use my existing xy-table
- Buying a ready made extruder
- Print both ABS and PLA
- Buy the electronics
Research and design
I’ve made this summary to include everything I’ve learned about 3d printing, my design decisions, and the techniques used in building the printer. I started by getting the terminology and the basics, talked to some people with 3d printers and tested their printers. As I had a lot of time while waiting for the parts to arrive, I did a lot of research before I started building the printer.
3D Printer basics
3D Printing 101 describes the basics of 3d printing. It tells that most 3d printers are much like a glue gun stuck to an xyz table. The x and y should move fast, the z should move slow and precise. The extruder is the “glue-gun” part that squeezes plastic into a hot tip, melting it onto the print surface. The filament is the “ink” which the printer uses to print, basically a spool of meltable plastic thread. A hot plate is a heated surface for the plastic to settle on. Getting started with RepRap gives some tips to people that already have a RepRap, and details how to set up the 3D printer before printing.
Kits
I looked at cheap PrintrBot and Reprap kits before I decided to use the microscope platform. It was actually the PrintrBot that got me into 3d printing, as I saw how cheap and easy it could be done. This video shows good prints using the PrintrBot and some other available printers.
Extruder
I considered to build the extruder myself, browsing the RepRap forums for options. One forum post details the different extruder variants people have made. Also found a nice post about it.
What I got from these posts were:
EZ Struder – Not very strong pulling of filament, but possible to make without too much effort (pic from reprap wiki):
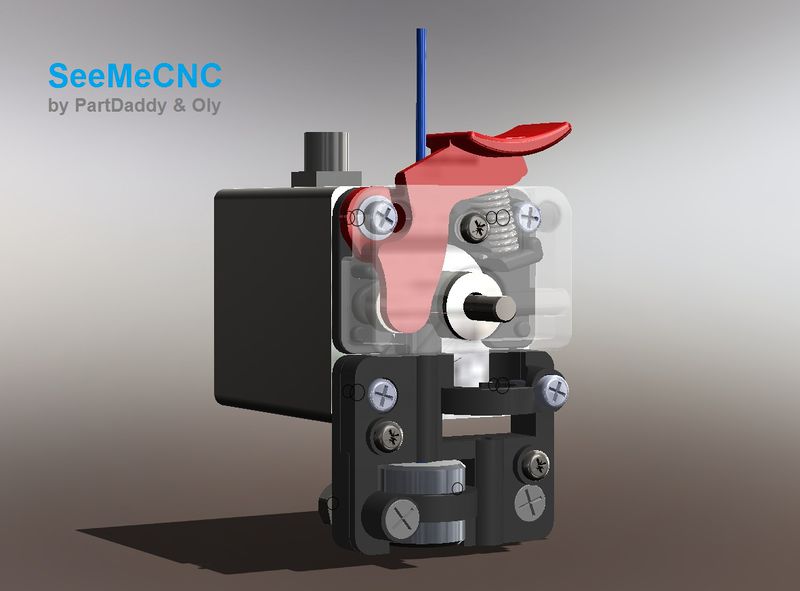
Berry Tripper – Stronger and more complicated, but better for smaller nozzle holes (pic from Thingiverse): I could possibly manage to make something like this (picture borrowed from the reprap forums):

I also considered to buy extruder parts at DealExtreme, and build the printable parts myself using power tools. But I already have a lot of parts to make myself, so then I looked at buying the whole thing.
DealExtreme has a couple of interesting extruders:
Heacent ET02 K Extruder
GZGW10 3D Printer Extruder
But on aliexpress I found an even cheaper one:
3D Printer Accessry 12V 0.2/0.3/0.4mm Nozzle Thermocouple Single Nozzle Print Head Extruder
The part is mostly metal, I hope this will make it more durable when the extruder starts generating heat. I decided to buy this one, and then possibly get back to making another extruder once the printer works.
Filament
Some points from MakerGeeks PLA vs ABS:
- If you’re printing with PLA you probably need a hot end temperature reading between 190 and 200 deg C, depending on speed.
- The printing temperature guideline for printing with our Premium ABS filament is approximately 235°C to 256°C
- PLA has much less tendency to warp compared to ABS. Therefore it can be printed both with and without a heated print bed.
- ABS is more flexible and PLA is more solid, meaning when stressed PLA will snap sooner.
- PLA is more glossy looking consumable than ABS
- One spool (1kg) of 3D Filament produces about 392 full sized chess pieces
Hot Bed
From MakerGeeks: If your desktop 3D printer does have a heated print bed it is recommended to set your print bed temperature to approximately 40° to 50° C for PLA and 80° to 110 ° C for ABS.
I bought a Elecfreaks PCB Heated MK2A heat bed from dx.com. This hot bed can run from 10A of 12v, so I’ll probably use a PC power supply for this.
The filament won’t stick to the hot bed itself, so for ABS I need Kepton or PET tape. Blue masking tape will suffice for PLA.
Electronics
If I make the electronics myself, it will take forever. Then I’ll probably also have to make the firmware myself, and more time passes. But I want a 3D Printer, and I don’t want to reinvent the wheel, so I bought the Melzi version 2 board.
This is basically an arduino with stepper motor controllers attached to it. It communicates with the computer by an virtual USB COM-port, or you can load the file by an SD-card. It has four A4988 stepper motor controllers, which can drive bipolar stepper motors for XYZ and the extruder.
Stepper motors
The basics of stepper motors are described here:
Jones on Stepping Motors
What I got from this was that my controller board expects bipolar stepper motors, that it has H-bridges and current overload protection.
A word that comes up a lot in 3D printer forums is NEMA17. This is a type of stepper motors. NEMA17 actually means that the front of the stepper motor is 1.7″ x 1.7″. There are loads of such motors available from several different suppliers. The length of the stepper motor (excluding the shaft) is proportional to the torque the motor can provide. NumberFactory’s Torque Conversions is useful to convert between the different units used to describe the torque. It seems that people use NEMA17 motors because they fit the maximum sized motors the existing driver boards can drive, and because they are cheap and readily available.
I bought three 42-BYGH47-401A motors, these are 47mm long NEMA17s.
Threaded rods and driving belts
I wanted to know if anyone made 3d printers using threaded rods. Checking the RepRap forum gave me this post, saying that most people use belts to print faster. The WolfStrap 3D printer used threaded rods. It is a fascinating printer made mostly from wood, but the builder later updated it to use toothed belts. ProtoParadigm compares leadscrews to threaded rods. Their conclusion leads me to stick to my threaded rods, as I don’t think the fact that they are not precise will be the bottleneck of my construction. I used this calculator to estimate how fast my printer will be.
Parts list
Taking all of this research into consideration, I came up with the following parts list:
- 2x M10 Threaded rods
- Hot bed (Elecfreaks PCB Heated MK2A)
- 3x Stepper motors (42-BYGH47-401A)
- Melzi version 2 board
- 3D Printer Accessry 12V 0.2/0.3/0.4mm Nozzle Thermocouple Single Nozzle Print Head Extruder
- PC power supply
- Microscope
- Aluminium scrap metal
- Green, red and blue ABS filament
Estimated total price of ~300$.